
Star Exchange
Contents
Note: Page references refer to original Companion Programs book pages.
Â
Introduction
Star Exchange converts documents created with one application to be compatible with documents created with another application. For example, you can convert a document originally created with WordStar 2000 to the WordStar format, and then edit the file as you would any WordStar document.
This documentation addresses conversions between WordStar and other applications. However, Star Exchange also converts between WordStar 2000 and other applications. Either WordStar or WordStar 2000 must be one of the applications in every Star Exchange conversion you do. For example, you can't use Star Exchange to convert between Microsoft Word and MultiMate.
Conversion doesn't alter the original documents; it produces separate, converted documents. After a document has been converted, it may need some editing to duplicate the exact appearance of the original. However, special codes, formatting, and word wrapping are retained during conversion, so the editing needed is minimal.
The Star Exchange documentation includes
- The "Introduction," which gives an overview of Star Exchange, lists the applications supported, and briefly describes the Automatic Translation feature.
- "Using Star Exchange," which tells you how to convert documents. This chapter also contains tips for editing converted documents and a list of features supported by Star Exchange.
- "Error Messages," which lists the error messages you may see in Star Exchange, tells you what they mean, and indicates what to do next.
Applications Supported by Star Exchange
Star Exchange supports over 50 applications. You can convert files from your favorite word processor as well as spreadsheets and databases. For a complete list of the supported applications, see "Supported Applications" in the Appendix.
ASCII conversions are useful in preparing documents for electronic mail transfer or for sharing documents with applications not supported by Star Exchange. Converting a document to ASCII allows an unsupported application to import, view, and print the converted document. In general, WordStar accepts standard ASCII data files, and it's not necessary to convert them through Star Exchange.
Automatic Translation
When converting between applications, you normally tell Star Exchange what application the source document was created with. If you don't know what application was used, that is, if you don't identify it to Star Exchange, Star Exchange can still determine the file format with its Automatic Translation feature. For more information, see "Using Auto Translate" in the chapter "Using Star Exchange."
Â
Using Star Exchange
You can install Star Exchange at the same time you install WordStar. You can also install Star Exchange by starting WINSTALL and using the Add or Remove a Feature option. For instructions on how to start WINSTALL, see the Installing and Customizing booklet. You can also use Add or Remove a Feature to add or delete any conversion application
When Star Exchange is installed on your computer, you can convert documents to or from WordStar. The two procedures available for converting documents are described below. Instructions for both procedures are in this chapter.
- "Quick Steps for Converting Documents" takes you quickly through the basic steps for conversion. Once you're familiar with Star Exchange, this information may be all you need to convert your documents.
- "Detailed Information on Converting Documents" provides complete details on all aspects of conversion, including screen examples and parameter information. This information supplements the "Quick Steps" procedure described above.
The instructions in this chapter tell you to select WordStar as Conversion A and the other application as Conversion B. You should be aware that WordStar can be either Conversion A or Conversion B. You can convert in either direction, from Conversion A to Conversion B or from Conversion B to Conversion A.
Note: Before you start a conversion, be sure to review the onscreen parameters for your application at least once. For more information, see "Setting Conversion Parameters" in this chapter.
Quick Steps for Converting Documents
- To convert documents, you can use either the quick steps below or the more detailed procedure that follows the quick steps (see "Detailed Information on Converting Documents").
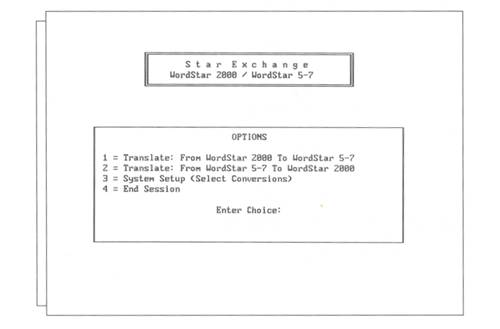
Start the session from either WordStar or the system prompt.
At the WordStar Opening Menu or screen, choose Star Exchange from the Additional Menu.
You can also start Star Exchange at the system prompt. Log on to the WS\CONVERT directory (or the directory containing your Star Exchange files). At the DOS prompt, type convert and press ![]() .
.
- Select the applications:
At the Main Menu, press 3 for System Setup. Be sure WordStar appears in the Conversion A box. Move the other application you'll use for the conversion into the Conversion B box. (Use the ![]() ,
, ![]() ,
, ![]() , and
, and ![]() keys to select applications and move them into the conversion boxes.)
keys to select applications and move them into the conversion boxes.)
- Press Esc to return to the Main Menu.
- Select the direction of conversion:
At the Main Menu, press 1 to translate from Conversion A (WordStar) to Conversion B, or press 2 to translate from Conversion B to Conversion A.
Note: If you choose Auto Translate or a database or spreadsheet as one of your conversions, only one option appears on the Main Menu: for example, Translate from Auto Translate to WordStar.
- Queue documents for translation:
Type the name of the source document, including the drive letter and directory path; for example, b:letter.doc. Press ![]() .
.
To queue documents from a directory:
- Press F2.
- Type the name of the drive or directory; for example, c:\wp\docs. Press
 .
. - Use the
 and
and  keys to scroll through the directory list.
 - Press to enter a highlighted document into the queue.
- Press Esc to end directory assistance.
- Translate the queued documents:
Press F10 to start conversion.
- End the session:
When conversion is complete, press any key to return to the Main Menu. At the Main Menu, press 4 to return to DOS.
- Edit the converted documents (see "Editing Converted Documents" in this chapter).
Detailed Information on Converting Documents
Starting the Session
Start the session from either WordStar or the system prompt.
At the WordStar Opening Menu or screen, choose Star Exchange from the Additional Menu.
You can also start Star Exchange at the system prompt. Log on to the WS\CONVERT directory (or the directory containing your Star Exchange files). At the DOS prompt, type convert and press ![]() .
.
The Star Exchange Main Menu appears.
The Main Menu options are described below.
- Options 1 and 2 display Input Queue screens where you list the documents you want to convert.
- Option 3 displays the Conversions Menu. You use this menu for selecting the applications you'll use for the conversion, setting parameters for naming and storing the translated documents, selecting the system work area where the documents are to be stored during conversion, and editing the character and typestyle filters.
- Option 4 returns you to DOS.
TIP Oncreen help is available from any Star Exchange screen where F1 = HELP is shown as an option. Press the F1 key for help; press Esc to leave the help screen.
Selecting an Application
- At the Star Exchange Main Menu, press 3 for System Setup. The Conversions Menu appears.
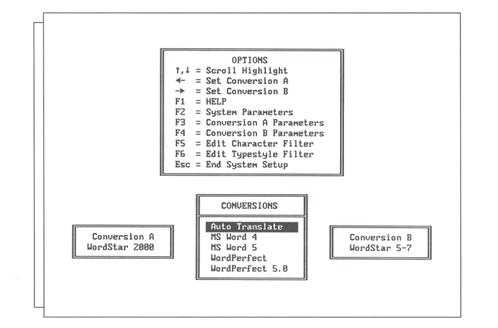
The Conversion boxes on the Conversions Menu show the applications and other file formats you can convert to or from with Star Exchange. To convert between WordStar and another application, WordStar should be in the Conversion A box and the other application in the Conversion B box. Once you set them up, the Conversion A and B boxes remain the same until you change them.
Note: If Auto Translate is one of your conversions, you don't need to identify the source application during System Setup. For more information, see "Using Auto Translate" in this chapter.
- Be sure WordStar is in the Conversion A box. Move the other application to be used in the conversion into the Conversion B box.
(Use the ![]() and
and ![]() keys to select an application; use the
keys to select an application; use the ![]() or
or ![]() key to move it into the Conversion B box.)
key to move it into the Conversion B box.)
Setting Parameters
After selecting an application, you can select options from the Conversions Menu that allow you to set parameters for the conversion. Default parameters have already been set in Star Exchange. You can use those if you wish, or you can change them. For example, you might want to change the Output Directory parameter that specifies where to store your converted documents (the default is the current drive and directory).
You should review the onscreen parameters for your application at least once before doing a conversion. Once you've set parameters for the conversion, you'll probably use the same ones for all conversions, unless you change computers or applications.
You can select the parameters options shown below by using the F2, F3, F4, F5, and F6 keys on the Conversions Menu.
- The System Parameters (F2) option is for setting parameters that affect the internal system work area, the keyboard type, the character filter file, and the spreadsheet delimiter and margins.
- The Conversion A Parameters (F3) option is for viewing or changing the parameters for the Conversion A application (WordStar).
- The Conversion B Parameters (F4) option is for viewing or changing parameters for the Conversion B application.
- The Edit Character Filter (F5) option creates a character filter file. It tailors the conversion by replacing a character found in the source document with a specific character in the converted document, based on the character filter file. This option is helpful when the destination application contains characters that are not supÂported by the source application.
- The Edit Typestyle Filter (F6) option allows you to substitute any typestyle (font) in your source document with any supported typestyle in the converted document. This is helpful when the destination application supports fonts that aren't supported by the source application.
Setting System Parameters
At the Conversions Menu, press the F2 key. The System Setup Menu is displayed.
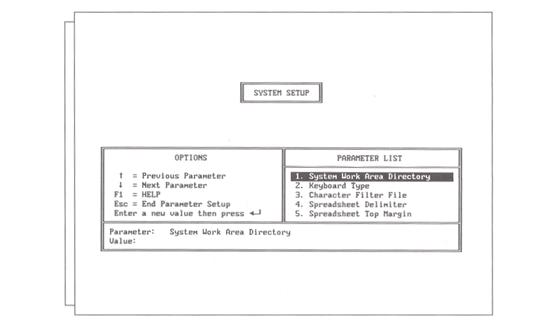
Use the ![]() and
and ![]() keys to highlight the parameter you want. The six parameters available are described below.
keys to highlight the parameter you want. The six parameters available are described below.
- System Work Area Directory This parameter determines where the intermediate work files are to be stored during conversion. Although Star Exchange automatically erases these files after each conversion, they temporarily need about 1 1/2 times the size of the largest document being converted.
To set this parameter, type a drive letter or the name of an existing drive and directory, and press ![]() .
.
- Keyboard Type This parameter is determined by the type of keyboard you have-disregard it unless you're using an alternative keyboard layout such as Norwegian, Danish, or Hebrew.
- Character Filter File This parameter specifies which existing character filter file to use for the current conversion. If you don't name an existing filter file in this parameter, none will be used. For more information, see "Edit Character Filter (F5)" in this chapter.
- Spreadsheet Delimiter This parameter specifies characters or keys that Star Exchange should insert between columns of converted spreadsheets or databases. You can select commas, tabs, or spaces. Tabs will help you align the columns once you edit the file in a word processor.
- Spreadsheet Top Margin This parameter determines the top margin of the converted spreadsheet when it is loaded into the word processor. Enter the value of the top margin and the unit of measure (cm, CM, in, IN, inch, or Inch). The default value is 1 inch.
- Spreadsheet Bottom Margin This parameter determines the bottom margin of the converted spreadsheet when it is loaded into the word processor. Enter the value of the Bottom Margin and the unit of measure (cm, CM, in, IN, inch, or Inch). The default value is 1 inch.
Setting Conversion Parameters (F3 and F4)
You can have some control over the codes and format information in a converted docuÂment by setting parameters during system setup. Star Exchange stores a separate set of parameters for each application it supports. Some parameters-primarily those that determine how converted files are named and stored-are standard for all supported applications. They are described on the following pages. Others, which you'll see on the onscreen parameter lists, apply to specific applications. These parameters are described on the help screens. To display help, press the F1 key.
The first time you use Star Exchange, the parameters are set to the default values. After that, the parameters for Conversions A and B are set to the values that were used for the most recent conversion.
To set conversion parameters, start at the Conversions Menu. Press F3 to set parameters for the Conversion A application (WordStar), or press F4 to set parameters for the Conversion B application. When the System Setup Menu appears, use the ![]() and
and ![]() keys to scroll through the parameter list. Each time you type a new value for a parameter, be sure to press
keys to scroll through the parameter list. Each time you type a new value for a parameter, be sure to press ![]() to save the value.
to save the value.
The standard parameters shown below are available for most supported applications. Use the ![]() key at the parameter list to check for possible additional parameters.
key at the parameter list to check for possible additional parameters.
Note: There are no parameters available for spreadsheet or database files since you can't convert to those formats.
Output Directory
This parameter determines where the converted files are to be stored. If you don't specify this information, the documents are stored in the current drive and directory.
To specify another directory, type the name of an existing directory and path, and press ![]() . For example, type c:\document to have the converted documents stored in the DOCUMENT directory on drive C.
. For example, type c:\document to have the converted documents stored in the DOCUMENT directory on drive C.
File Naming Method
This parameter determines how converted files are named. Five ways for naming files are available, as shown below.
- Original Filename with User Defined Extension If you select this method, the filename of the source document is automatically assigned to the converted document in this form:
[Output Directory][Original File Name].[Output File Extension].
The Output Directory and Output File Extension parameters are also used to build the filename.
EXAMPLE
If a source document named LETTER.XYZ is converted to a different application, and the parameter values are
Output Directory = C:\DOC
File naming Method = Original Filename with User Defined Extension
Output File Extension = .ABC
then the converted file is named: C:\DOC\LETTER.ABC.
- Original Filename with Original Extension Choose this method if you want the converted document to be automatically assigned the same name as the source document.
Note: If Star Exchange creates the converted document in the same directory as the source document, your source document will be overwritten.
- User Defined Filename with User Defined Extension The user assigns the filename and the extension. The Output Directory, User Defined Filename, and User Defined Extension parameters are used to build the filename.
- User Defined Filename with Original Extension The user assigns the filename and Star Exchange assigns the file extension, using the original extension from the source document. The Output Directory and User Defined Filename parameters are used to build the filename.
-
Note: When a document of the same name already exists, Star Exchange prompts you for instructions. Then you can either type a new name and press
or press Del to overwrite the existing document. - Prompt User for Filename This method allows the user to assign the filenames. When you select this parameter, Star Exchange prompts you for a name as each document is converted. You must also include the drive letter or directory name, as necessary, and any mandatory file extension; for example, DOC for documents that are converted to MultiMate.
User Defined Filename
If you selected a file naming method where the user assigns the filename, use this parameter for the filename.
You may include a plus sign (+) as the last character in the filename if you want to increment the filenames automatically with numbers, starting with 001 . (DOS allows only eight characters for a filename, so limit your filename to five characters when you use the plus sign.)
EXAMPLE
| USER DEFINED FILENAME | FILENAMES OF CONVERTED DOCUMENTS |
| ABC+ | ABC001, ABC002, ABC003, etc. |
| ABC+XÂ | ABC001X, ABC002X, ABC003X, etc. |
| + | 001, 002, 003, etc. |
User Defined Extension
If you selected a file naming method where the user assigns the file extension, use this parameter for the extension.
You may include a plus sign (+) in the extension if you want to automatically increment the extensions with numbers starting at 01. (DOS allows only three characters for a file extension, so limit your extension to one character when you use the plus sign.)
EXAMPLE
| USER DEFINED EXTENSION | EXTENSIONS OF CONVERTED DOCUMENTS |
| A+ | .A01, .A02, .A03, etc. |
| + | .001, .002, .003, etc. |
Note: Special extensions are required by MultiMate 3.6, Advantage II and Wang PC (.DOC) and MultiMate (.DOX). You cannot alter the extension for these word processors. For other applications, use any valid DOS extension. (See also the default extensions on the help screen for this parameter.)
Replacement Character
This parameter defines a special character to be inserted in the translated document to mark the location of any non-translatable character found in the source document. Replacement characters are represented by Hex-ASCII codes; for example, Hex 40 is represented on the screen by an @. (Hex-ASCII codes are listed in the "ASCII Character Charts" in the Reference manual.)
Sometimes a source document contains a character that cannot be translated. The character you specify in this parameter will be inserted in the translated document when a non-translatable character is found. In the converted document, this "marker" indicates a character that needs correcting.
Input File Type
This parameter is useful if you have a database file that you want to use with WordStar. When you choose Data File as your Input File Type, Star Exchange converts your data file to an ASCII comma delimited file. (When you convert a data file, Star Exchange changes the Spreadsheet Delimiter from tabs or spaces to commas.) You can use the converted file as a data file for merge printing.
Edit Character Filter (F5)
This option allows you to tailor a conversion by creating a file that replaces a specific character (or characters) found in the source document with any character in the converted document. This option is helpful when your destination application does not contain characters that are supported by your source application.
TIP If you want a filter file to be used during conversion, you must specify the drive, filename, and the extension of that file in the Character Filter File parameter (see "Setting System Parameters(F2)" in this chapter).
To create a filter file:
- At the Conversions Menu, press F5.
The Filter Table is displayed.
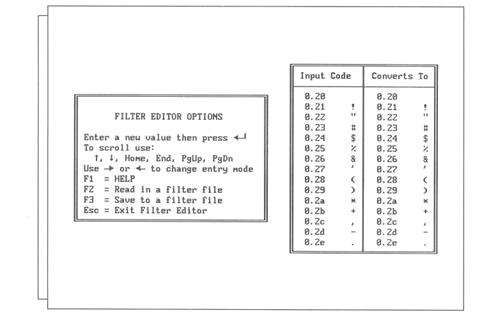
In the Filter Table, the values in the Input Code column, which represent characters in the source document, cannot be changed. The values in the Converts To column are the actual replacement characters. These values can be changed.
- In the Converts To column, use the
 ,Â
,  , , and keys to move the cursor to the character you're replacing.
 - To change a character, type either a new character (the replacement character) or the Hex-ASCII representation for that character (see the "ASCII Character Charts" in the Reference manual).
- When the filter file is complete, press F3 to save it.
- At the Save File: prompt, type a filename and press .
The filename can be any name and extension you choose, and can include a drive name and directory. If you don't include a drive and directory, the default is the current directory.
- Press Esc twice to return to the Main Menu.
To edit an existing filter file:
- At the Filter Table, press F2.
- At the Read File: prompt, type the name of the filter file you want to edit.
- Make changes and save them as in "To create a filter file" above.
- Press Esc twice to return to the Main Menu.
Edit Typestyle Filter (F6)
This option allows you to select the typestyle, or font, that you want used in a converted document when that font isn't supported by the source application. The font you choose must be supported by the destination application.
The typestyle you choose for your translated document must have the same pitch as the typestyle in the source document. For example, if the source document uses 10 pitch, you can't select a typestyle that is 12 pitch for the translated document. If you do, Star Exchange ignores your selection.
If your conversion includes WordStar 2000 or WordPerfect, be sure to specify the WordStar 2000 PDF file or the WordPerfect PRS file in the appropriate Conversion A or Conversion B Printer Description File parameter during system setup. Specify the drive letter or directory path, if necessary. Otherwise, Star Exchange won't be able to find the correct typestyles.
To edit the typestyle filter:
- At the Conversions Menu, press F6.
- At the Choose a Direction to Edit screen, press 1 or 2 to select the direction of your conversion.
The Typestyle Filter Menu is displayed.
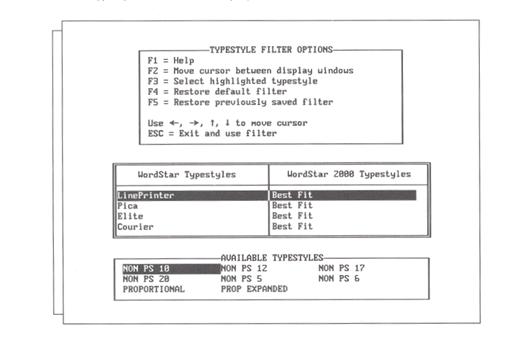
On this screen, the top window lists the options available; the middle window lists the typestyles supported by both the source and the destination applications; the bottom window lists the available typestyles for the destination application (you select a typestyle from this list).
- Select options as needed:
F1 displays Help, which includes complete instructionsfor editing the Typestyle Filter.
F2 moves the cursor between the Options window and the Available Typestyles window.
F3 selects the typestyle highlighted in the Available Typestyles window.
F4 restores the original Star Exchange defaultfilter for use in subsequent converÂsions.
F5 displays the previously saved filter changes and allows you to make furtherchanges.
F10 saves your changes.
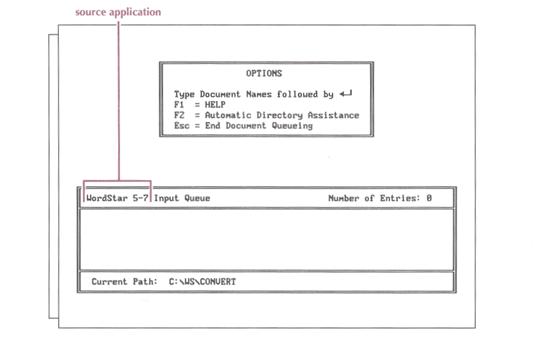
Queuing Documents for Translation
When the parameters are set as you want them, press Esc twice to return to the MainMenu. (You'll see a message on the screen telling you the parameter settings are being saved.) At the Main Menu, press 1 or 2 to choose the direction of conversion, either from A to B or from B to A.
The Input Queue appears. On this screen, you specify the documents to be convertedby manually typing each document name or by selecting each document (or an entire directory) from an onscreen directory display.
The Input Queue, shown below, has room for 100 document names. The applicationnamed on the screen is the source application, the one you're converting from.
Note: When you use the Auto Translate option, the Input Queue screen is divided into two sections-one for the document names andone for the names of the source applications, as determined by Star Exchange. For more information, see "Using Auto Translate" in this chapter.
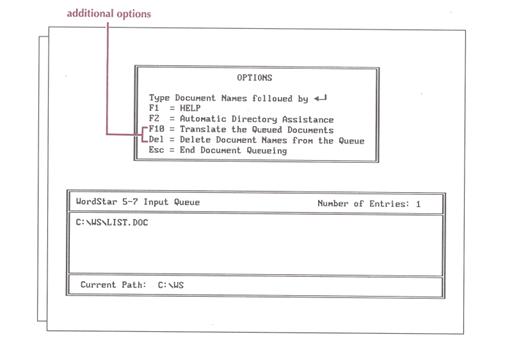
After you enter the first document name into a queue, the OPTIONS list changes to include two more options, as shown below.
- To type individual document names in the queue, see "Manual Entries" below.
- To select documents from a directory display, see "Automatic Directory Assistance," which follows "Manual Entries."
Manual Entries
In the Input Queue screen, type the first documentname (using either upper- or lower-case letters), and press ![]() . Continue typing document names, pressing
. Continue typing document names, pressing ![]() after each one, until you've entered all the documents that belong in the queue.
after each one, until you've entered all the documents that belong in the queue.
- To queue individual documents, type the drive letter or directory path; for example, b:letter.doc or c:\ws\convert\letter.doc.
Note:If the drive letter or directory path that appears at the bottom of the Input Queue is where your source documents are located, type only the document names in the queue. When you press ![]() , Star Exchange adds the path information.
, Star Exchange adds the path information.
- To queue all >documents on a disk or in a directory, type the drive letter or path, and use the DOS wild-card character *.
- To queue documents with related filenames, use the DOS wild-card characters and ?, and include any identifying drive letter or directory.
EXAMPLES
a:*.*All documents on the disk in drive A.c:\ws\convert\*.*All documents in the WS\CONVERT directory on drive C.a:*.txtAll documents with a .TXT file extension on drive A.c:\ws\convert\feb??89All documents with the filename FEB??89 (where ?? is any date) in the WS\CONVERT directory on drive C.
| TYPE THIS | TO QUEUE THESE DOCUMENTS |
CAUTION All documents in a queue must have been created with the application you chose for theconversion (the source application). Don't mix documents from different applications in the same queue, unless you're using Auto Translate.
Automatic Directory Assistance
Using Automatic Directory Assistance is the fastest way to queue documents that are in the same directory. To add files to the Input Queue using the Directory Assistance screen, follow the quick steps below. For more detailed information about the Directory Assistance screen, see "Using the Directory Assistance Screen" in this chapter.
- At the Input Queue screen, press the F2 key. The Directory Assistance screen appears.
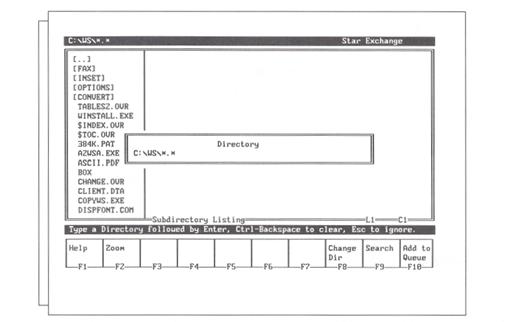
- Press Esc to move to the window on the left side of the screen, which lists the names of all the documents and subdirectories in the current directory. The names in brackets are subdirectories. When a filename is highlighted, the contents of that file appear in the window on the right side of the screen.
- Use the cursor keys to scroll through the document names. When the document you want to convert is highlighted, press F10 to add it to the queue.
- When you finish adding documents to the queue, press F8 to display the Directory window and specify a different drive and/or directory, or press Esc to end Automatic Directory Assistance.
Deleting Documents from the Queue
- Incorrectly typed entries or other improper entries should be deleted from the queue before conversion. Star Exchange doesn't verify that an entry exists until it tries to translate it. Any document that is incorrectly named cannot be translated.
- A queue is not erased automatically after conversion.
- All queues are erased when the session is ended or when you select a different direction of conversion on the Main Menu.
You can delete individual document names or you can delete an entire queue by following these steps:
- At the Input Queue, press the Del key.
This OPTIONS window appears.
- Using the T and I keys, highlight the document you want to delete. (To delete the entire queue, skip this step and go to step 3.)
- Press Del to delete the highlighted document. Or press and hold the Alt key while you press D to delete the entire queue.
- When you finish deleting files, press Esc.
Using Auto Translate
The Auto Translate option on the Conversions Menu lets you convert documents for which the source applications, or file formats, have not been identified to Star Exchange. You simply enter the unidentified files into the Input Queue, and Star Exchange identifies their formats.
To use Auto Translate, choose Auto Translate and WordStar from the Conversions Menu during system setup. Then choose Translate: From Auto Translate to WordStar from the Main Menu. (When Auto Translate is one of the two conversions selected, only one conversion direction is available-from Auto Translate to WordStar.) At the Input Queue, enter the document names as usual, either manually or using Automatic Directory Assistance. As you enter the document names, Star Exchange identifies them and displays their file formats onscreen.
When you use Auto Translate, the Input Queue is divided into two parts. The document names appear on the left side of the screen; the file formats appear on the right.
If you enter an unidentified document into the queue, and the document was created by an application that is not supported by Star Exchange, the word UNKNOWN appears on the right side of the queue opposite the document name. During conversion, Star Exchange bypasses that document and goes on to the next document it recognizes.
Some short WordPerfect 4.2 documents and some ASCII and WordStar 3.3x files may not be recognized by Auto Translate. These documents contain limited or no formatting codes that can be used to determine the origin of the document. Star Exchange treats these documents like any other unidentified document-it displays UNKNOWN next to the document name in the queue. The only way to translate such documents is to manually select the conversion as Conversion A or Conversion B.
Translating Queued Documents
When the queue is ready, press F10 to start the conversion.
CAUTION Be sure you have enough room on your output disk for the converted files-about 1 1/2 times the size of the combined input files.
Two windows appear on the screen. One shows the Input Queue (the document being converted is highlighted); the other displays the name of each converted document as it is completed. If you're using Auto Translate, the name of the source application for the document appears while the document is being translated.
After conversion begins:
- To interrupt a session, press Esc and follow the onscreen instructions.
- If you selected Prompt User for File Name as your File Naming Method, Star Exchange prompts you for filenames. Be sure to preface each name with the drive letter and directory name, if necessary.
- If you choose a filename that already exists, the program prompts you to either rename the translated document or overwrite the existing document.
- If conversion fails, an error message is displayed. Then you can either press Esc to end the session, or press to translate the next document in the queue.
- After a conversion error occurs, files with the extension .INT may be left on the disk. These files take up disk space unnecessarily and should be deleted.
- When conversion is complete, you can either delete the queue and build another one, or you can press Esc to return to the Main Menu.
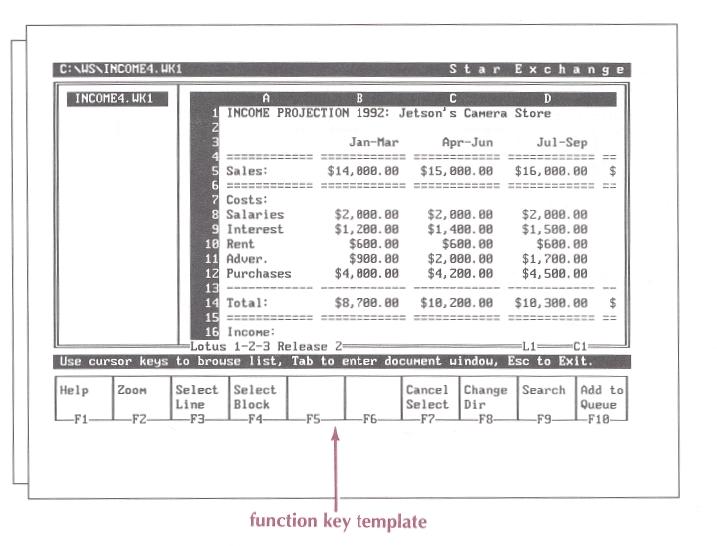
Using the Directory Assistance Screen
The Directory Assistance screen consists of several parts, as shown below.
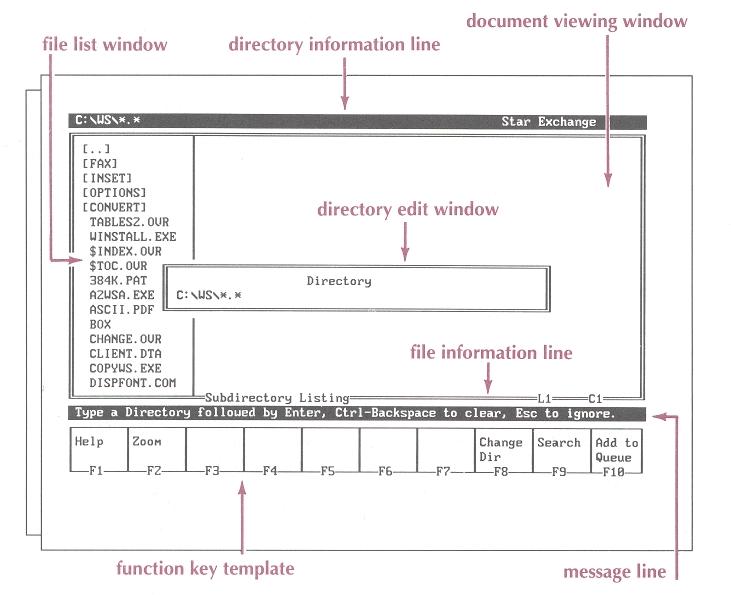
- The Directory Information Line displays the path Star Exchange is using. The path consists of the drive, directory(ies), and filename.
- The Directory Edit Window lets you specify the directory and filename for the document you want to view and/or convert.
- The File List Window lists the files in the current directory and its subdirectories, if any.
- The Document Viewing Window displays the contents of the file that is highlighter in the File List Window.
- The File Information Line displays the file format and cursor position for the file displayed in the Document Viewing Window.
- The Message Line displays status information or instructions for completing a task.
- The Function Key Template displays the function keys available on the current screen and what they do. For some functions, you use the Ctrl key along with the function key. For a complete list of the function keys available at the Directory Assistance screen, see "Directory Assistance Keys" in this section.
Using the Directory Edit Window
You can use the Directory Edit Window to specify the drive, directory, and filenames you want. To display the Directory Edit Window from the Input Queue screen, press F2. To display it from the Directory Assistance Screen, press F8.
To change the directory in the Directory Edit Window, press the Backspace key or press ^Backspace to delete the current directory. Then type the new directory name and the filename. To specify filenames in this window, you can use DOS wild-card characters.
Using the File List Window
The File List Window appears on the left side of the Directory Assistance screen. It displays the parent directory and its subdirectories, and all the filenames in those directories.
You can move the highlighting through the subdirectories and files to find the ones you want. To add a highlighted file to the Input Queue, press the F10 key.
About the File List Entries
When the Directory Assistance screen appears, the cursor is located in the Directory Edit Window. You can press Esc to close that window. Then the cursor moves to the first line of the File List Window. If the current directory is a subdirectory, the first entry in the file list looks like this: (..]. This symbol represents the parent directory of the subdirectory you're in. For example, if you are in the DOCS subdirectory of the WS directory (C:\WS\DOCS), the (..] symbol represents the WS, or parent, directory. If you highlight the (..] symbol and press ![]() , Star Exchange changes to the WS (parent) directory.
, Star Exchange changes to the WS (parent) directory.
If the current directory is the root directory, the first entry in the File List Window is either a subdirectory or a file, depending on which was created first. Subdirectories are enclosed in brackets, for example, [WS]. Files appear as regular text, for example, SHAKE.DOC.
Finding Subdirectories and Files
The File List Window lets you move easily through the directories on your disk to find the files you want. For example, if you're in the root directory and you want to view C:\WS\DOCS\SHAKE.DOC, you would first highlight the [WS] subdirectory entry and press ![]() . Then you would highlight the [DOCS] subdirectory entry and press
. Then you would highlight the [DOCS] subdirectory entry and press ![]() . Finally, you would highlight the SHAKE.DOC filename. When SHAKE.DOC is highlighted, the contents of that file appear in the Document Viewing Window.
. Finally, you would highlight the SHAKE.DOC filename. When SHAKE.DOC is highlighted, the contents of that file appear in the Document Viewing Window.
As you move the highlighting through the list of files in the File List Window, the File Information Line changes to reflect the various file formats. This line identifies the file format and the cursor position in the file. If a document contains no formatting codes or codes that Star Exchange cannot recognize, the File Information Line displays ASCII or Other.
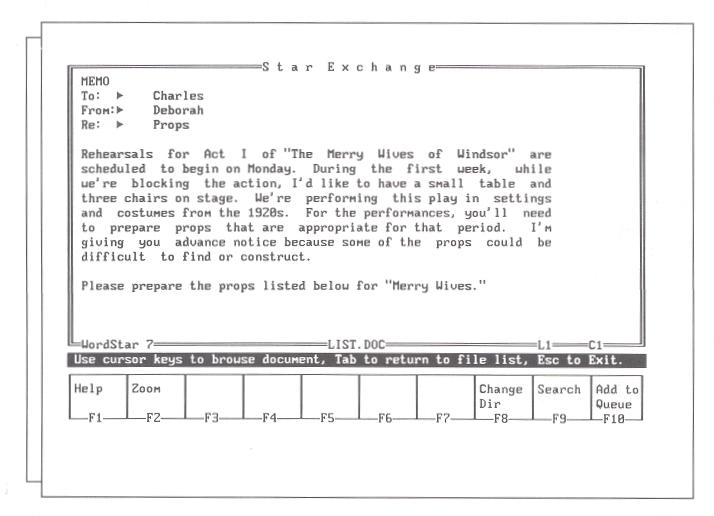
Using the Document Viewing Window
The Document Viewing Window displays the contents of the file or subdirectory that is highlighted in the File List Window. After highlighting an entry in the File List Window, press the Tab key to move into the Document Viewing Window. Then use the cursor keys to scroll down through the file.
Note: You can view but not edit text and data in the Document Viewing Window.
- If the highlighted file in the File List Window is a subdirectory name, a message in the Document Viewing Window tells you the name of the subdirectory and how many files are in it. You can scroll down the screen (press the PgDn key once or twice) to view a list of the files in that subdirectory. The list includes the same information you would see after entering a DIR command in DOS.
- If the highlighted file in the File List Window is a filename, the contents of that file are displayed in the Document Viewing Window. How the file appears onscreen depends on the format and type of file. For example, word processor files appear in their original format.
When you highlight an .EXE or .COM file, the Document Viewing Window displays the message: This File is an Executable (.EXE) File. It is not viewable.
Zooming in on Files
To magnify the Document Viewing Window so that it fills the entire screen, press the F2 key. Then the Document Viewing Window blocks out the File List Window and looks like this:
To toggle out of Zoom mode and redisplay the File List Window, press the Tab key or the F2 key. To view a different file while in Zoom mode, press the plus (+) or minus (-) key on the numeric keypad. The + key highlights the next file in the File List Window; the - key highlights the previous file.
Searching for Text
You can find specific text in a file by using the Search function. In the Document Viewing Window, press F9. The Search window appears:
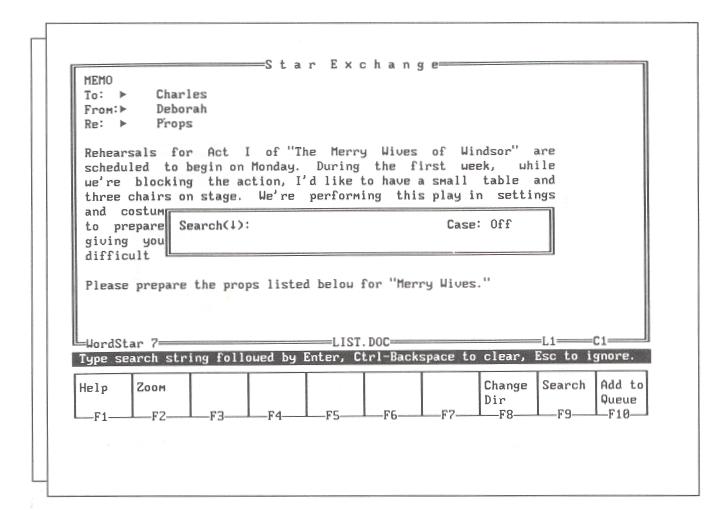
Notice the two prompts in the middle of the window:
- The Search prompt (the arrow) shows which direction the search will take. Press T to search upward through the file or I to search downward.
- The Case prompt shows whether case sensitivity is on or off. When Case is on, Star Exchange searches for a string with the same capitalization as the search string. When case sensitivity is off, Star Exchange ignores capitalization. Press PgUp to turn case sensitivity on or PgDn to turn it off.
You can enter up to 40 characters in the Search window. If you are searching for a key word, you can enter all or part of the word. When you enter part of a word, Star Exchange displays the first match it finds. For example, if you enter Fin, Star Exchange might find the words "Final," "Finish," or "Finland."
To search for a text string, type the text in the Search window and press ![]() . When Star Exchange finds the text, it places the cursor at the first character in the text and displays Search Completed in the Message Line. To find the next occurrence of the text string, move the cursor past the found text and press ^F9.
. When Star Exchange finds the text, it places the cursor at the first character in the text and displays Search Completed in the Message Line. To find the next occurrence of the text string, move the cursor past the found text and press ^F9.
Note: Star Exchange may not find text strings that are separated by word wrap or a line break.
Converting Spreadsheet and Database Files
Star Exchange can convert complete data files or just specified parts of spreadsheets and databases. When you highlight a spreadsheet or database in the File List Window, and press Tab, the Function Key Template at the bottom of the screen looks like this:
To select just part of a spreadsheet or database file, you define the selected section to Star Exchange in one of the following ways:
- By selecting individual rows or records
- By selecting a block of data
- By selecting a noncontiguous range of rows and columns
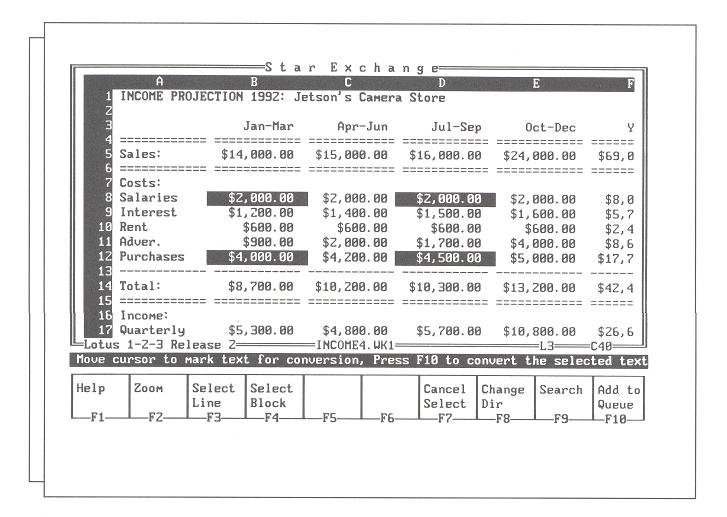
Selecting Individual Rows or Records
Use the F3 key to select one row (in a spreadsheet) or record (in a database) at a time. First, press F3 to define the beginning of the selected area. Then press the T and I keys to extend the area. As you move the cursor up or down, entire lines or records are added to the selected area.
Selecting a Block of Data
Use the F4 key to select a block (rectangular area) of data. When you press F4, the current cursor position becomes one corner of the rectangle. Then use the arrow keys to move the cursor to define the opposite corner of the rectangle. This selection method is handy for converting columns or tables.
Selecting Noncontiguous Rows and Columns
In spreadsheet and database files, you may want to select only certain rows and columns rather than an entire block of data. You can do so by using the ^F3 and ^F4 commands to select horizontal and vertical ranges. ^F3 selects the Horizontal Range function and ^F4 selects the Vertical Range function. These two functions work together. You define the ranges; the selected area is defined by the intersection of those two ranges.
Instructions for defining the ranges shown in the following examples appear on page 31.
EXAMPLES
Suppose you want to convert the Salaries and Purchases rows in the example below. The rows are noncontiguous, that is, they are not side by side. Each row is a Horizontal Range. When these ranges are selected, the spreadsheet looks like this:
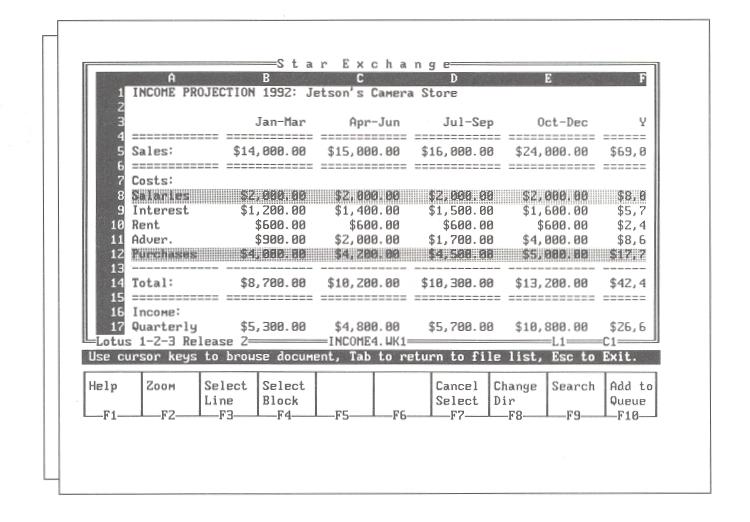
The Jan-Mar and Jul-Sep columns in the example are also noncontiguous. Each column is a Vertical Range. When these ranges are selected, the spreadsheet looks like this:
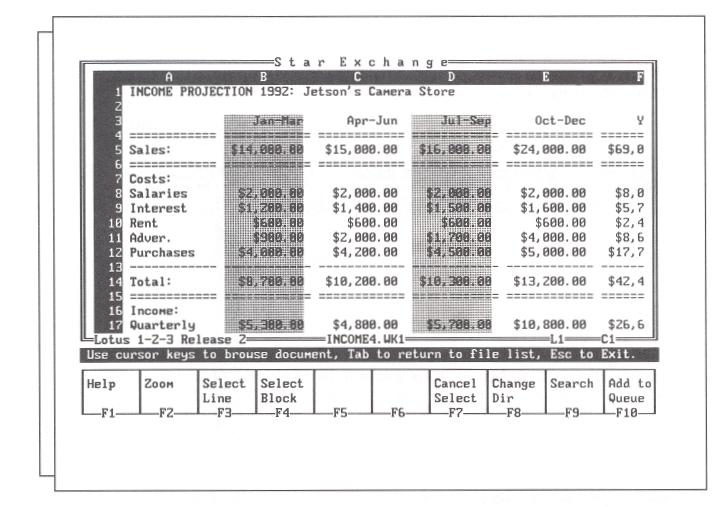
The selected area is defined by the intersecting areas of the Horizontal Range and the Vertical Range. The following example shows the two ranges and how they intersect to define the selected area:
Defining the Ranges
- To define a horizontal range:
Move the cursor to the first row in the range and press ^F3. If the range includes more than one row, move the cursor up or down to define all the rows you want to include. To define the end of the range, press the Spacebar. The Spacebar anchors the range so you can move the cursor again without extending the range. Repeat these steps until you have defined all the horizontal ranges.
- To define a vertical range:
Move the cursor to the first column in the range and press ^F4. If the range includes more than one column, move the cursor left or right to define all the columns you want to include. To define the end of the range, press the Spacebar. Repeat these steps until you have defined all the vertical ranges.
After you have defined both ranges, the intersecting areas (the selection area) appear in reverse video. If you find that the selected area includes any rows or columns that you don't want, you can deselect them the same way you selected them.
Directory Assistance Keys
You can use the keys listed below in the Directory Edit Window, the File List Window, and the Document Viewing Window.
| PRESS THIS KEY | TO DO THIS |
| A - Z | Move the cursor in the File List Window to the next entry that begins with the same letter. |
| - (minus) or + (plus) key | Display the previous (-) or next (+) file in the list. |
| Change the current directory to the directory highlighted in the File List Window. | |
| F1 | Display a help screen. |
| F2 | Toggle the Document Viewing Window in and out of Zoom mode. |
| F3 | Select a row or record in a spreadsheet or database. |
| ^F3 | Select a Horizontal Range of rows or records in a spread sheet or database. |
| F4 | Select a block (rectangular area) of data in a spreadsheet or database. |
| ^F4 | Select a Vertical Range of columns or records in a spread sheet or database. |
| F7 | Cancel all selections in a file. |
| F8 | Display the Directory Edit Window. |
| F9 | Search through a file for a keyword or text string. |
| ^F9 | Find the next occurrence of the search text. |
| F10 | Add the highlighted document to the Input Queue. |
Editing Converted Documents
When conversion is complete, you should review the translated documents. Changes may be necessary to duplicate the appearance of the original document.
Here are some tips for editing your documents:
- Scan the document for replacement characters. These are the "markers" that Star Exchange inserted for any nontranslatable characters it found in the source document. For more information, see "Replacement Character" in this chapter.
- Check the appearance of any columns in the document. If the line length used for word wrapping varies widely between the two applications in the conversion, you may need to adjust column indentations.
- When you first edit documents that have been converted to DisplayWrite or MultiMate, refer to the instructions below.
DisplayWrite If the translated documents are stored in Revisable For Text (RFT), use the DisplayWrite utility "Convert Documents" to convert the documents into text files before you edit them.
MultiMate Large documents translated into MultiMate can exceed the maximum number of format lines, number of pages, and so on, that are allowed. These documents are split into separate documents during conversion. You may wish to do some minor editing to establish breaks between these documents.
Features Supported by Star Exchange
The word processing features supported by Star Exchange are listed below.
| Soft carriage returns | Hard carriage returns | Centering |
| Regular tabs | Decimal tabs | Underlining |
| Bold | Superscript/subscript | Columns |
| Titles | Overstrike | Stop codes |
| Hard hyphens | Soft hyphens | Indenting |
| Right and left margins | Line spacing | Automatic page breaks |
| Headers and footers | Forced page breaks | Italic |
| Pitch/font | Footnotes | Nonprinting comments |
| Top and bottom margins | Offsets and gutters | Â |
Transferring Converted Files to the Macintosh
When converting a document file to a Macintosh word processor format, you need to consider the type of file (MacBinary or Standard) that you want the conversion to produce. If you plan to convert to Standard format, you'll need to use the Macintosh Tagger program to tag the files. If you plan to convert to MacBinary format, you don't need to tag the files. For more information on file types and the Tagger program, see "Macintosh File Types" and "Using the Macintosh Tagger" in this section.
Note: The terms tag and tagging used in this section are Star Exchange terms, not Macintosh terms. They are used to describe a process that, in Macintosh terms, is similar to changing the creator/type for a file.
The three basic methods for moving a file between the PC and the Macintosh are Apple File Exchange, Superdrive, and direct transfers.
Apple File Exchange and Superdrive
The Apple Superdrive is a standard part of most Macintosh systems. This drive lets the user read DOS formatted disks and can be used to transfer DOS files to a Macintosh disk. This procedure is accomplished using an application called Apple File Exchange (AFE), which is a standard part of Macintosh System 6.0 and later. (For more information, see the "Macintosh Utilities User's Guide.")
If you plan to use AFE to transfer your converted file to the Macintosh, be sure (in System Setup) to select Standard as the file type in the Output File Type parameter for the Macintosh format.
When using AFE to move a converted document to the Macintosh, make sure no special translation has been done to the file. This means that special translators (such as Text Translation) should not have check marks next to them in the MS-DOS to Macintosh menu. (This menu does not appear until a DOS disk is inserted into the system.)
A product called DOS Mounter by Dyna Communications allows a DOS disk in a Superdrive to look just like a Macintosh disk to the Finder. In this case, the converted file should be dragged to a real Macintosh disk and then tagged, as explained in "Using the Macintosh Tagger" in this section.
Direct Transfers
Many combinations of hardware and software allow the transfer of files between a PC and a Macintosh. Some of them are as follows:
- Direct serial or parallel connections using standard communications software such as ProComm, Smartcom, or Crosstalk on the PC and MacTerminal, and Microphone or Red Ryder on the Macintosh.
- Modem or network connections using standard communications software.
- Connections using dedicated file transfer software/hardware combinations such as LapLink Macintosh, MacLink Plus Pc, or pcAnywhere.
- Any other connections that allow file transfer.
When using one of the above connections to transfer files, first determine whether or not your Macintosh software will allow the Macintosh to receive files in MacBinary format. Most current Macintosh communications software permits the use of the MacBinary file. Most PC communications software can send the MacBinary file using XMODEM protocol. And virtually all specialized software and hardware can receive and send MacBinary files.
If the transfer software you're using allows MacBinary file transfers, select MacBinary (in System Setup) as the Output File Type parameter for the Macintosh format. Once a file has been transferred to the Macintosh as a MacBinary file, it is ready to be used with the word processor for which it was created. No tagging should be necessary.
If your software does not support MacBinary files, select Standard as the Output File Type parameter for the Macintosh word processor. When the file has been transferred to the Macintosh, you will need to tag it for the word processor you will be using.
Macintosh File Types
As noted above, Macintosh conversions in Star Exchange can produce a Macintosh document in two formats, MacBinary and Standard. (The Standard format is often called the Data Fork.)
PC files are created using a single stream of bytes and some fairly unimportant information like the creation time and date. PC-based applications can open almost any file, regardless of its name or other information maintained by the operating system.
Macintosh files are created using two streams of data called the Data Fork and the Resource Fork. These two forks include information maintained by the Macintosh operating system that associates a creator and type with the file. The Macintosh uses this information to display special icons on files and to allow the user to start an application by double-clicking on a document. If a Macintosh document does not have the correct creator or type, it cannot be opened, not even by the application that created it.
The MacBinary and Standard formats are described below.
- MacBinary When a Macintosh file resides on a non-Macintosh system, you can use the MacBinary format to preserve the information, as well as the separate Data Fork and Resource Fork. This format groups the file's name, creator and type information, and Data Fork/Resource Fork into a single stream of bytes. Most communications programs on the Macintosh can send and receive Macintosh files in this format, allowing the transfer of Macintosh files to and from a non-Macintosh system with no loss of information.
- Standard In certain network situations or when the transfer method does not support MacBinary, the conversion can produce only the Data Fork of the Macintosh file. This format is called Standard. A file produced with the Standard Option and transferred to the Macintosh is not accessible to the word processor for which it was created. This inaccessibility is caused by incorrect or missing creator and type information. To give this type of transferred document the correct creator and type information, you need to use the Macintosh Tagger program available from WordStar.
Using the Macintosh Tagger
The Macintosh Tagger sets the creator and type information for a file or a group of files on the Macintosh. You can run the Tagger program from the master distribution disk or you can copy Tagger to your Macintosh hard disk and run it from there.
Note: If you're converting files from a PC-based format to the Macintosh Standard format, you'll need to use the Tagger program. This program is not included with the Star Exchange disks. To order your free copy of the Tagger program, call WordStar Customer Support.
The example below shows the various parts of the Tagger.
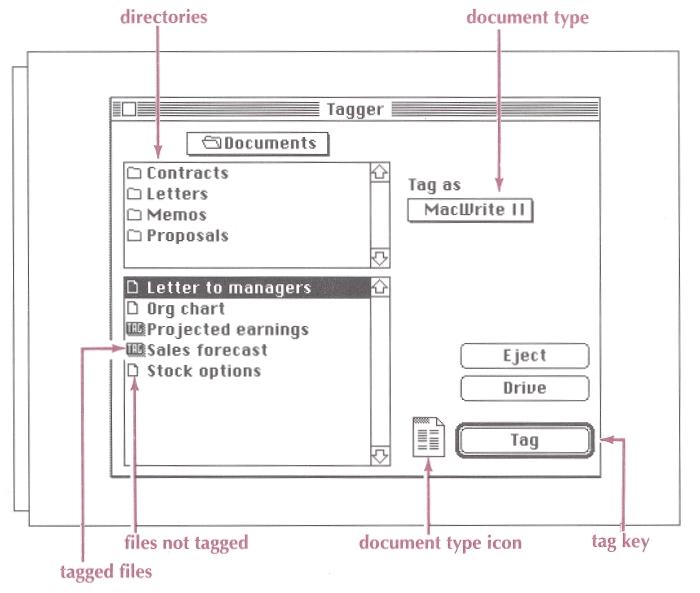
The left side of the Tagger looks very much like the standard Open File dialog box used in almost every Macintosh application. The difference between the Tagger and other Macintosh software is that the folders and files in the Tagger are listed separately.
The right side of the Tagger has a pop-up menu for selecting the creator/type that will be attached to the selected files and a Tag button that attaches those files to the selected creator/type.
To use the Tagger, follow the steps below.
CAUTION Be sure you select only the documents you have converted with Star Exchange and transferred to your Macintosh. Tagging files produced in other applications will not be recognized by their original application. The best way to guarantee that no other files are tagged is to transfer all new files to an empty folder.
To tag files:
- Select the disk and folder where your converted document(s) is located.
- Select the word processor format the document(s) was converted to.
- Select the document from the list of filenames. (To select more than one document at a time, hold down the Shift key while you click the filenames.)
- Choose the Tag button.
- Exit the Tagger.
The documents you tagged have the correct icon and are ready to use with the Macintosh word processor.
Remember - use the Tagger only for files that were converted to Standard format. Files converted to MacBinary format, and transferred to the Macintosh using a MacBinary transfer, have already been tagged.
If a conversion produces a MacBinary document, and the document is transferred to the Macintosh without using a MacBinary transfer, the document will not be recognized by the Macintosh word processor for which it was created.
Only the receiving Macintosh needs to understand MacBinary. MacBinary is implemented on top of other transfer protocols such as XMODEM, and the PC communications software does not have to understand anything about MacBinary.
CAUTION The current version of the Tagger does not allow you to undo mistakes.
Transferring Macintosh Files to the PC for Conversion
Macintosh conversions can identify and convert files that are in MacBinary format or that are binary images of the Macintosh file's Data Fork. This process is not noticeable to the user and does not depend on the Output File Type parameter setting. Almost all transfers from a Macintosh to a PC will result in one of these two formats (MacBinary or Standard).
Error Messages
This chapter lists error messages that may appear on your screen in Star Exchange.
You have tried to view a file that is locked by another application. This could be the file loaded in another program, or a file that is locked out on a network. You would see this message if another network user has loaded the file you want to view.
One or more of the program files required by Star Exchange has been damaged or did not copy correctly during installation. Start WINSTALL and choose Add or Remove a Feature. Reinstall the conversion format with the damaged file.
A Star Exchange conversion file is missing. Start WINSTALL and choose Add or Remove a Feature. Add the conversion format that you want.
You may not have enough memory (a minimum of 384K RAM is required). If you're using another memory-resident program such as SideKick or Inset®, remove it from memory and try the conversion again.
Star Exchange cannot use the work area. In the System Parameters option, check to see if the drive letter (including the colon) and the directory are correct. Be sure the disk has enough room (about 1 1/2 times the size of the largest document) for the work area.
Star Exchange cannot read the source document. There may be an error on the disk containing the document. Move the file to another part of the disk.
Star Exchange cannot complete the conversion and write an output file because there is not enough room on the disk to write the file. Delete any files you don't need, and repeat the conversion.
- Star Exchange can't find the document listed in the Input Queue. Be sure the document name in the queue is correct. Delete the name from the queue, and use the Automatic Directory Assistance document queuing method to resubmit it for conversion.
- The path information may not be correct-check to see if it is.
- Too many files may be open. Be sure the FILES=30 statement is in your CONFIG.SYS file.
Â
Your system does not have enough memory to execute the conversion (a minimum of 384K RAM is required). To correct the problem, add more memory to your system.
- Star Exchange can't translate a document because it wasn't created on the source application for the Input Queue being converted. Convert the failed document in another session, using the correct source application.
- The document you're trying to convert has a format that is not supported by Star Exchange.
- Star Exchange can't read the source document. Using the source application, edit the source document for discrepancies; for example, maybe the document wasn't saved correctly.
The RTLINKST.COM file is damaged or missing. Use COPYWS to copy the file from the original compressed disk to the WS\CONVERT directory. Then rerun Star Exchange. For instructions on how to use COPYWS, see the Installing and Customizing booklet.
One or more of the RTLINK files has been damaged or deleted. Use COPYWS to copy the RTLINKST.COM file and the SCC_??.RTL file from the original compressed disk to the WS\CONVERT directory. Then rerun Star Exchange. For instructions on how to use COPYWS, see the Installing and Customizing booklet.
The SCC_??.RTL file cannot be found. Use COPYWS to copy the file from the original compressed disk to the WS\CONVERT directory. Then rerun Star Exchange. For instructions on how to use COPYWS, see the Installing and Customizing booklet.
You may have selected the wrong conversion format for the document you're trying to convert. For example, if you select WordPerfect 5.0 from the Conversions Menu and then try to convert a WordPerfect 4.2 document, you may get this error message. If you do, make sure you selected the correct format for the document you're trying to convert. If the format is correct, go back to your source application and edit the source document-scroll to the end of the document and then save it. Then try using Star Exchange again to convert the document.
Star Exchange can't create a file for a converted document or for a work area.
- Be sure the disk has enough room (about 1 1/2 times the size of the largest document) for the work area.
- Be sure the FILES=30 statement is in your CONFIG.SYS file.
- Be sure you provided a valid DOS filename for the translated document, including the correct drive letter, a colon, and (if needed) a directory path.
- If you're using the Prompt User for Filename method for naming files, be sure to include any required drive letter and directory path. If you want documents named automatically, use the System Parameters option to change the filenaming method to Default Title.
- Using the System Parameters option, check to see if the drive letter (including the colon) and the directory or RAM disk are correct.
One or more of the definition (.DEF) files has been deleted from the WS\CONVERT directory. Use COPYWS to copy the DEF files you need from the original compressed disk to the WS\CONVERT directory. Then rerun Star Exchange. For instructions on how to use COPYWS, see the Installing and Customizing booklet.
- Press Esc to abort the conversion. Return to DOS. Type type file.Iog on the command line and press . The FILE.LOG file is displayed; it contains a message giving you the probable cause of the error.
- Star Exchange can't read the source document. Using the source application, edit the source document for discrepancies; possibly the document wasn't saved correctly.
Supported Applications
The applications listed below are supported by Star Exchange.
WORD PROCESSORS
| Â | Â |
| PC-Based Format | Version/Release |
| DEC WPS PLUS (DX) | 3.0 and earlier |
| DisplayWrite 2, 3, 4, 5 | All |
| First Choice | 3.0 and earlier |
| IBM Writing Assistant | 1.01 |
| MASS-1 1 | 8.0 and earlier |
| Microsoft Word | 4.0 through 5.5 |
| MultiMate | 3.6 and 4.0 |
| MultiMate Advantage | All |
| MultiMate Advantage 2 | All |
| Nota Bene | 3.0 |
| PFS:Write | A, B, and C |
| Professional Write | 2.2 and earlier |
| Samna Word | IV Plus and earlier |
| SmartWare II | 1.5 and earlier |
| Volkswriter 3, 4 | All |
| Wang PC (IWP) | 2.6 and earlier |
| WordMARC Composer | Plus and earlier |
| WordPerfect | 5.1 and earlier |
| WordStar | 7.0 and earlier |
| WordStar 2000 | 3.5 and earlier |
| XyWrite | III+ and earlier |
| Â | Â |
| Macintosh-Based Format | Version/Release |
| Microsoft Word | 4.0 |
| WordPerfect | 2.0 and earlier |
| Mac Write II | 1.1 |
| Â | Â |
| Other Formats | Version/Release |
| ASCII | N/A |
| Intelligent ASCII | N/A |
| DCA/FFT | All |
| DCA/RFT | All |
| Navy DIF | All |
| Microsoft RTF | 1.0 and earlier |
SPREADSHEETS
| Â | Â |
| Application | Version/Release |
| Enable | 3.0 |
| First Choice | 3.0 and earlier |
| Framework | III and earlier |
| Lotus 1-2-3 | 3.0 and earlier |
| Lotus Symphony | 2.0 and earlier |
| Microsoft Excel | 2.0 through 3.0 |
| Microsoft Works | 2.0 |
| Mosaic Twin | 2.5 |
| PFS: Professional Plan | 1.0 |
| Quattro | PRO and earlier |
| SuperCalc 5 | All |
| SmartWare II | 1.5 |
| VP Planner 3D | 1.0 |
DATABASES
| Â | Â |
| Application | Version/Release |
| dBASE | IV and earlier |
| Data Ease | 4.0 |
| dBXL | 1.3 |
| Enable | 3.0 |
| First Choice | 3.0 and earlier |
| FoxBase | 2.1 |
| Framework | III |
| Microsoft Works | 2.0 |
| Paradox | 2.0 through 3.5 |
| Q&A | 3.0 |
| R:Base | 3.1 and earlier, System V, Personal |
| Reflex | 2.0 and earlier |
| SmartWare II | 1.02 through 1.5 |
Note: If you want to convert dBXL or FoxBase files, select dBASE as the conversion application to represent these files.
Â